So You Want to Fix a Panic Bar. Prepare for Chaos.
Listen up. You’re here because your exit device—let’s drop the corporate ‘panic bar’ nonsense—has failed. It’s sagging, sticking, or shattered from an enthusiastic ‘shoulder audit.’ You, a procurement professional conditioned by ERP nightmares and vendor excuses, think you can handle this. I admire the hubris. Let’s navigate this mess with the grim realism of a quarter-end close.
Step One: The Tedious Audit You’ll Skip
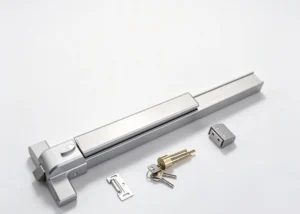
This isn’t sourcing office chairs. You can’t just order a ‘chair.’ Is your device rim-mounted (a slab of metal bolted to the door)? Mortise (a complex mechanism buried inside it, costing as much as your annual toner budget)? Surface vertical rod? Concealed vertical rod? The variation is a supply chain hellscape.
Actionable Intel: Photograph everything. The device, the door edge, the top, the bottom. Scrape off the grime and find the manufacturer’s stamp. Von Duprin, Sargent, Yale, Corbin Russwin. This is your SKU. Walking into a supplier with a photo and a part number is power. Walking in with a description like ‘the long pushy thing’ is a one-way ticket to being overcharged and underwhelmed.
Step Two: Tooling & Budgeting for Reality
Forget the ‘standard office maintenance kit.’ You’ll need:
- A high-torque drill/driver. The one from facilities that dies on the third screw is not it.
- A full set of screwdrivers and hex keys. Both metric and imperial, because the universe is cruel.
- Pliers – needle-nose and channel lock. For persuading metal that refuses to align.
- A flat bar or small pry bar. For ‘non-destructive’ removal that will inevitably be destructive.
- A center punch. To stop drill bits from skating off curved surfaces and ruining the door’s finish.
- A metal tape measure. Your retractable cloth one is for measuring cubicle real estate, not precision hardware.
- A helper. Not a colleague who ‘has a call.’ Someone you can bribe with a real lunch, not vending machine snacks.
- Patience. A non-inventory item you are critically low on.
Step Three: The ‘Simple’ Rim-Mount Swap – A Procurement Case Study in Scope Creep
Assume the common rim-mounted style. The project plan looks simple. The execution is a masterclass in delays.
- Disengage the Mechanism: There’s usually a hex key or flathead slot to put it in ‘service mode.’ If it’s broken, this is your first point of failure. Document it.
- Remove the Cover Plate: Simple. Two screws. Underneath lies the true scope: the massive, aged mounting screws securing the unit to the door. These are your critical path.
- Extract the Mounting Screws: They are long. They have been torqued for decades. Apply penetrating oil. Wait. Apply more. Use the correct driver bit and apply vertical force. Stripping these heads initiates a costly drill-out procedure, blowing your timeline and budget.
- Disconnect the Latch Assembly: The device is also attached to the latch case on the door edge. This involves more fasteners. Your initial photos are now vital for reassembly.
- Remove the Old Unit: It is heavy, awkward, and greasy. It will attempt to fall. Your helper is now on risk mitigation duty.
- The Hole Alignment Debacle: You now have a door with a pattern of holes. The new unit’s mounting plate will not match this pattern perfectly. This is not a defect; it is a universal constant. You must now decide: modify the new unit’s plate (if possible), drill new holes in the door (committing to a path), or attempt a hybrid solution that will cause future alignment issues.
- The Latch Mortise Mismatch: The recess in the door edge for the old latch will not fit the new one. You will spend hours with files and chisels, trimming fractions of a millimeter. Test-fit constantly. A binding latch is a non-functional latch.
- Install the New Latch: Secure it flush and firm. This is your foundation.
- Mount the New Exit Device: Heft it into place. Have your helper support it. Start the mounting screws but do not fully tighten. You must test the mechanism’s operation. The bar must throw the latch smoothly and return fully. Adjust. Test again. This is the quality assurance phase.
- Final Assembly: Tighten all fasteners. Reattach the cover. Conduct rigorous operational testing. The action must be consistent and reliable.
Step Four: Advanced Scenarios – When to Outsource
If your device involves vertical rods (mechanisms that run up and/or down the door to latch at the top and bottom), cease work immediately.
This is no longer a procurement exercise; it is a precision engineering task. The alignment tolerances are sub-millimeter. Attempting this as a DIY project will result in a non-functional door, wasted days, and a costly emergency call to a specialist. Your role here is not installer; it is project manager. Your task is to source and manage a qualified, licensed door hardware contractor.
The Grumpy Realities (The Fine Print)
- Door Handles: An optional exterior handle/lever involves separate components—spindles, trim plates—that must be compatible. This is a sub-assembly with its own bill of materials.
- Finishes: ‘Brushed Chrome’ is not a specification. You need the manufacturer’s finish code (e.g., US4 Satin Chrome). A mismatch looks unprofessional and will be flagged.
- Functionality: Is it exit-only? Does it require a dogging mechanism to lock it open? Did you procure the correct functional model?
The Final, Non-Negotiable Directive
This is not merely a hardware replacement. This is a Life Safety Device. Its performance is critical in an emergency. In a commercial, public, or multi-tenant building, its installation and operation are governed by building codes and fire safety regulations.
Your local Authority Having Jurisdiction (AHJ)—the Fire Marshal, building inspector, or other regulatory body—has strict requirements. An improper installation creates liability, fails inspection, and most importantly, compromises safety.
Therefore, for any door in a commercial, public, or rental property: Your procurement process must end with the engagement of a licensed and insured locksmith or door hardware specialist. Their cost is not an expense; it is the budget line for compliance, expertise, and risk mitigation. They ensure it is done correctly and to code.
If this is for a private, single-occupancy structure and you are assuming all risk… you have been briefed on the challenges. Proceed with caution, document your process, and for the sake of your sanity, do not strip those mounting screws.