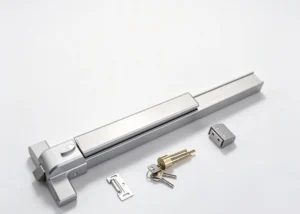
So You Want to Hack Up a Panic Bar? A Procurement Manager’s Snark-Filled Reality Check
Right. The math is simple: a 48-inch panic bar and a 36-inch door. The directive from above is even simpler: “make it fit.” So here you are, clutching a $900 piece of listed life safety hardware in one hand and a $29.99 hacksaw in the other, poised on the brink of a decision that will lead either to quiet professional satisfaction or to a fire marshal writing your name down in his little book with feeling. I’ve ordered, received, and had to return the aftermath of enough botched jobs to fill a warehouse. Let’s navigate this minefield of metal shavings and liability, shall we?
Step Zero: The Label – Your First Reality Check
Before the intoxicating smell of cutting oil clouds your judgment, flip the damn thing over. Look for the label. It must explicitly state “FIELD-CUTTABLE” or “ADJUSTABLE LENGTH.” If it doesn’t, stop. You are holding a paperweight that, if modified, transforms into a liability sculpture. Cutting a non-field-cuttable bar instantly voids its UL listing, its warranty, and any hope of passing inspection. The Authority Having Jurisdiction (AHJ)—the inspector with the power to halt your project—will spot it from across the room. His sigh will cost you three weeks.
Step One: Disassembly – A Photographic Memory is Non-Negotiable
Clear a large, clean surface. Not the floor. A table. Take your phone out. Photograph everything. Every angle, every screw position, every spring orientation before you breathe on it. This is not a best practice; it is your only lifeline when you’re holding a mysterious, spring-loaded widget and your confidence has evaporated. Remove end caps, unbolt the main tube from the mounting plates, and—with the reverence of a bomb disposal expert—relieve the tension on the internal spring. If it pings into the ceiling tiles, you’ve already failed. Organize the parts. Label them. Your future self, sweating at 4:45 PM, will thank you.
Step Two: The Measurement – Where Good Intentions Die
You need to remove 12 inches total. The crucial, soul-crushing detail every rookie misses: you don’t cut it from one end. You must maintain center. This means removing 6 inches from each end of the main tube. Now, the second trap: the tube doesn’t butt against the end cap; it sockets into it. You must deduct that socket depth (often 0.5″ – 0.75″) from your cut. If the instructions say “allow 0.625″ for end cap engagement,” and you ignore it, you’ll proudly install a 35.5-inch bar on a 36-inch door. It will look like you let a toddler do the math. Measure thrice. Have a colleague scowl at your tape measure. Then measure again.
Step Three: The Cut – Precision, Not Passion
Banish the hacksaw from your mind. This is a precision metal cut, not a tree branch. You need a fine-tooth blade on a power miter saw, a metal-cutting bandsaw, or at the very least, a high-quality jigsaw with a metal blade. Clamp the tube aggressively to prevent movement; a wobble here begets a crooked, useless part. The cut must be perfectly square. Not “close.” Perfect. After cutting, you will have created a razor-sharp, burred edge—a masterpiece of latent injury. Deburr the inside and outside thoroughly. Then, blow out every single metal shaving from the tube. These microscopic demons will migrate into the latch mechanism and bind it, creating a panic device that… doesn’t.
Step Four: Reassembly – The Sadist’s Jigsaw Puzzle
Now the real fun starts. The tube is shorter. Everything inside must be shorter too.
- The Spring: If it’s a long coil spring, you likely need to cut it. Don’t just snip. Compress it with zip ties, cut it cleanly, and carefully re-form the end coil. Mishandle this, and the bar’s return action will be sloppy or violent.
- The Actuator Rod: This is the heart of the operation. It connects the push bar to the latch. It must be shortened by the same total amount (12 inches), usually from both ends. This rod often has threaded ends. You may need to cut and re-thread it. If the phrase “using a die” causes a cold sweat, pause. This is a common point of catastrophic, inspection-failing error.
- Internal Guides: Higher-end bars have internal rails or guides. These too must be shortened with precision. A fine-tooth saw and a file are your friends here.
Dry-fit everything. Without the spring tension, ensure the mechanism operates smoothly through its full range. Binding now means failure later.
Step Five: Installation & Adjustment – Where Theory Meets a Stripped Screw
Mounting the hardware is its own special hell of precision drilling and avoiding stripped screws in the door edge. Once mounted, the diagnostics begin:
- Too Stiff? The spring is too strong or internal shavings are causing binding.
- Sloppy/No Return? Not enough spring tension.
- Latch Doesn’t Retract Fully? Actuator rod is now too short or geometry is off.
- Latch Retracts But Door Won’t Open? Misalignment with the strike plate.
Step Six: The Litmus Test – Beyond “Does It Open?”
This is a life safety device, not a cabinet latch. Test it violently. Push with one hand at either end and in the middle. It should activate with consistent, minimal pressure (typically under 15 lbs) across its entire length. Do this fifty times. Listen for any grind, catch, or hesitation.
THE NON-NEGOTIABLE AHJ WARNING: THIS IS THE ONLY PART THAT MATTERS
Let’s be brutally clear. You can execute a flawless, museum-quality modification. It is utterly meaningless if the AHJ does not accept it. You have altered a listed device. The burden of proof is on you.
Before you make the first cut:
- Possess the manufacturer’s official, model-specific field-cutting instructions. A generic PDF from a different product is worthless.
- Explicitly verify with your local AHJ (Fire Marshal/Building Inspector) that they will accept a field-cut device on this door. Some jurisdictions forbid it outright. Some require pre-approval. Never assume.
- Keep all documentation—product data sheet, instructions, proof of listing—on site for the inspection.
- Internalize the liability. If that door fails in an emergency due to your work, “the boss said to” is a epitaph, not a defense. Your name, your license, your reputation are on the line.
In summary: Cutting a panic bar is precision metalworking grafted onto a high-stakes compliance puzzle. If this process feels beyond your tools or tolerance for chaos, stop. Order the correct length. The extra lead time is infinitely cheaper than the cost of a failed inspection, a rushed re-order, or the unthinkable.
Now, if you’ll excuse me, I have to go audit a box of mismatched hinge pins. The excitement never ends.