So You Need an Exit Device. Wonderful. Let’s Proceed with Managed Expectations.
Look, I’ve been procuring, overseeing, and (God help me) occasionally fixing the installations of exit hardware for longer than some of you have been breathing. I’ve seen the requisitions from facility managers who think “panic bar” is a technical term. I’ve audited the invoices for “weekend projects” that ended up costing five figures in emergency call-outs and re-work. I’ve seen the hollow-core doors with heavy-duty rim devices screwed on with… I swear to you… drywall anchors.
So your department needs one. Code compliance. Tenant improvement. A misguided attempt to look “industrial chic.” I don’t care about the why. I care about the how—specifically, how to prevent you from creating a liability nightmare that lands on my desk at 4:55 PM on a Friday. What follows is not a warm, fuzzy DIY guide. It’s a field manual for navigating the intentional chaos of life-safety hardware, delivered with the snark you deserve.
Phase 1: The Strategic Pre-Procurement Interrogation
Before you even think about issuing a PO, answer this under oath: Is this door a designated means of egress? Is it the path people are legally, morally, and practically required to use to escape a fire? If “yes,” then this is not a purchase. It is a life-safety procurement event. The International Building Code, NFPA 101, and a legion of insurance auditors are your new stakeholders. Fail here, and you’re not just a buyer who made a mistake; you’re a co-defendant.
If it’s just for convenience—a back-of-house door to the dumpster—the stakes are merely financial and reputational, not criminal. A slight improvement.
Now, conduct a basic site audit. Forward and back. Door Material: Steel? Wood? Aluminum? Glass? This dictates device type, weight, and mounting strategy. You cannot, under any circumstances, approve a device whose weight and operation will destroy the door substrate. Door Swing: It must swing outward. If it swings inward, abort the mission. Your project just expanded to include door and frame replacement. Update your budget forecast accordingly and pour a drink.
Phase 2: The Vendor Negotiation & Product Selection Gauntlet
You will be tempted by the online marketplace. You will see a “Commercial Panic Bar” for $129.99 with free shipping. This is a trap. That product is for a garden shed where the consequence of failure is a raccoon getting into your compost. For a commercial egress door, you procure commercial-grade hardware. Full stop. Think: Von Duprin, Sargent, Corbin Russwin, Allegion, ASSA ABLOY. The price point ($400 to $2,000+) is a feature, not a bug. It’s the market’s way of filtering out the unserious.
You must understand the taxonomy. This is basic vendor management:
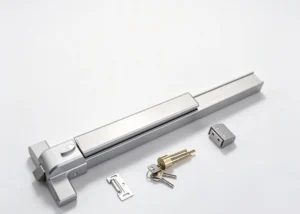
- Rim Device: Mounts on the door’s interior face. The “economy of scale” option. Relatively straightforward installation. Common, visible, a bit utilitarian. Your baseline.
- Mortise Device: Inserts into a precision pocket cut into the door edge. Clean, secure, superior. Requires a skilled installer with a mortising jig and a deep well of patience. The cost of failure is a ruined door leaf.
- Surface Vertical Rod: Features vertical rods that latch at the head and sill of the frame. For oversized or heavy doors. A geometric nightmare of alignment tolerances. If your maintenance crew isn’t trained on it, you’ll own a perpetual service call.
For this exercise, we’ll assume you’ve, wisely, specified a rim device on a steel door. The most common, and therefore most commonly butchered, scenario.
Phase 3: The Tool & Labor Specification (Or, What Your Contractor Should Actually Have)
When you review the quote from your installer, their “tools & equipment” line item should not just say “standard install kit.” Be a nuisance. Imply you know what you’re talking about. They should possess and deploy:
- Precision measuring devices (calipers, high-accuracy tape measures). “Close enough” is a myth.
- A manufacturer-provided installation template, used religiously. Not a photocopy. Not a best guess.
- High-torque, variable-speed drills with sharp, brand-specific metal-cutting bits and hole saws.
- Center punches, deburring tools, and files. Holes must be clean, not torn.
- Multiple levels and squares. Door frames are never true; the hardware must be.
- The manufacturer’s installation guide, physically on-site, not cached in someone’s phone where the signal is bad.
If they balk at this, find a new vendor. Their chaos is not the charming, artisan kind.
Phase 4: The Template & Layout – Where Projects Go to Die
The installation template is a flimsy piece of paper that holds more power over your project’s success than your CEO’s vague “vision statement.” Its proper use is the single greatest predictor of a successful install.
The contractor must affix it to the door exactly as prescribed. Height from floor. Distance from door edge. These are non-negotiable engineering specifications, not aesthetic suggestions. If the template calls for 42 inches to the centerline of the crossbar, 41.75 inches is a defect. Mark, center-punch, verify. Then verify again. This phase should feel tedious and overly cautious. If it doesn’t, they’re rushing.
Phase 5: The Fabrication Point – Drilling & Cutting
This is the moment of irreversible commitment. Drilling into a steel door leaf is a commitment. It requires proper RPMs, cutting fluid, and secured work. The screech of a dull bit on metal is the sound of your project timeline and your contractor’s margins evaporating simultaneously.
The latch bolt hole in the door edge is the linchpin. Its diameter, depth, and location must be perfect. A 1/16-inch deviation can mean the latch won’t engage the strike plate with full throw, compromising security and fail-safe operation. Every hole must be deburred. This isn’t finishing; it’s ensuring actuator rods don’t fray and that the installers don’t file a workers’ comp claim for lacerations.
Phase 6: Assembly & Integration – The Mechanical Puzzle
Now the components—crossbar (inside), outside trim, latch bolt, actuator rods—must become a system. This is where the installer’s skill separates from the handyman’s enthusiasm.
The instructions are the contract. Follow them. Rod lengths must be adjusted. Mounting screws are specific to door thickness. Over-tightening can bind the mechanism; under-tightening guarantees a rattling, unprofessional finish. There is a tactile sweet spot for crossbar tension—firm enough to prevent accidental depression, fluid enough to open under panic conditions with minimal force. Finding it is an art.
Phase 7: The Strike Plate – The Interface Point
The device on the door is useless without its counterpart in the frame: the strike plate. This is where most field-measured installations fail. Marking the frame must be done with the door in the closed position, transferring the latch location with diabolical precision.
The strike plate must be recessed (mortised) into the frame so it sits flush. A hammer and chisel or a router must be used with care. A splintered, ragged mortise is a sign of rush work. Critically, the mounting screws must anchor into the frame’s structural stud, not just the doorstop trim. Anchoring into trim is an invitation for forced entry and a guaranteed inspection failure.
Phase 8: The Operational Acceptance Test (The “Proof of Shame”)
Do not authorize payment upon “visual completion.” Demand a witnessed test protocol.
- Latching: Does the door latch securely, audibly, every time it closes?
- Egress Function: From inside, does a smooth, full press of the crossbar instantly and fully retract the latch, allowing the door to push open seamlessly?
- Force Requirement: Does it meet code (often ≤15 lbs of force)? Test with a push-pull scale. “Feels okay” is not data.
- Outside Operation: If equipped with an outside lever, does it also smoothly retract the latch?
- Cycling: Operate the device 50-100 times. Listen for binding, grinding, or clicking. Feel for hitches or stiffness. A good install is silent and consistent.
Any failure here is a punch-list item. Do not close the ticket.
Phase 9: The Post-Procurement Reality: It’s a Living System
Your job isn’t over when the invoice is paid. An exit device is a mechanical life-safety system. It requires scheduled preventive maintenance. Specify this in your service contract: annual inspection, lubrication with manufacturer-approved dry lubricants (not WD-40, for the love of all that is holy), screw tightness checks, and cycle testing.
Procuring and installing an exit device is an exercise in managing chaotic variables—material tolerances, human error, archaic building conditions. The goal is not perfection, but controlled, compliant, reliable execution. Anything less is a liability you’ve just purchased and bolted to a door.
AHJ WARNING: Listen carefully. This is the only part of this document devoid of sarcasm. The Authority Having Jurisdiction (AHJ)—your local Building Official, Fire Marshal, or Code Inspector—holds absolute, final authority. Everything written above, the manufacturer’s specifications, even the national codes, are subordinate to their interpretation and local amendments. You must secure all required permits. You must schedule and pass all required inspections. Installing life-safety hardware without AHJ approval is not a shortcut; it is an act of legal and financial self-sabotage. It can invalidate insurance, trigger massive fines, result in operational shutdowns, and impart catastrophic personal liability in the event of an emergency. The AHJ is your final and most critical stakeholder. Manage that relationship with the respect, paperwork, and forethought it demands.