The Grumpy Procurement Manager’s Guide to Rooftop Access Doors: Weatherproofing Panic Bars & Ending the Drip
Let’s not pretend. You’re here because you’ve got a problem. Water is dripping from the panic bar of your rooftop access door onto something catastrophically expensive. Or an inspector just handed you a failure notice with a smirk. Or, you’re blessed with foresight and are trying to avoid the first two nightmares. Welcome. We’re going to talk about one of the most perpetually botched, idiotically overlooked details in commercial roofing: weatherproofing the panic device on an exterior door.
Everyone focuses on the flashings, the curbs, the membrane seams. Then they install a door assembly that might as well have a built-in sprinkler system because they treated the panic hardware like it’s on an interior office door. It’s a special kind of procurement and installation failure we get to inherit.
The Core Lie: “Vertical Rain”
First, let’s dismantle the fairy tale. Suppliers and lazy spec writers love to talk about weatherproofing for vertical rain. This is a fantasy sold by people who have never stood on a roof in a storm. Rain is never vertical. It’s wind-driven. It’s horizontal. It gets whipped up, under, and around parapets. It finds the path of least resistance with the tenacity of a lawyer chasing a billable hour. Your rooftop door isn’t in a protected alcove; it’s on the front line of a wet, windy siege.
The Problem, in Plain English: You Drilled Holes in a Rain Barrier
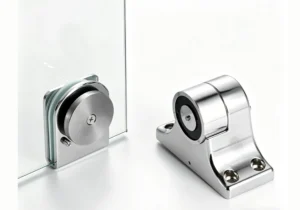
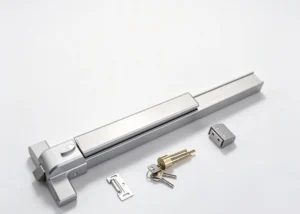
Think about a standard rim-type panic device (push pad, touchbar—call it what you want). It’s a long metal box mounted on the inside of the door. To make it work, a rod or series of rods must pass from that bar, through the door leaf, to the latch on the outside edge.
Congratulations. You’ve just drilled a primary highway for water directly into your building envelope. Water runs down the exterior face of the door. When it hits the threshold, its job is to go out. But those rod holes? They’re a welcoming, low-resistance detour in. Water follows the rods into the internal mechanism of the panic bar, and then, with pathetic inevitability, drip… drip… drip… onto your server room floor or electrical gear.
Some manufacturers (the good ones) know this. They build in weep holes or drainage channels in the panic bar housing. The theory is sound: if water gets in, let it drain out before it enters the building. The execution is where everything goes to die. Those drain holes MUST be on the exterior side of the door’s primary weather seal. If they’re on the interior side, you’ve installed a dedicated, interior-mounted water feature. It’s not a design flaw; it’s an installation IQ test. Most fail.
The So-Called “Solutions” That Make Everything Worse
Let’s review the carnival of failure, so you know what you’re probably dealing with.
- The Blob of Caulk. The universal fix of the desperate. Smear a glob of silicone around the rod penetration. It works for six months. Panic devices move. They get pushed. The caulk cracks, peels, and fails. Now you have a leak and a disgusting, unprofessional mess. The next guy who has to service it will curse your name.
- The Interior Drain Tube. I’ve seen this. A little vinyl tube shoved into the panic bar’s drain hole, routed to a bucket on the floor. This isn’t a repair; it’s an admission of defeat. You are now actively managing a chronic leak. Also, a bucket on the floor is a trip hazard. Add a slip-and-fall lawsuit to your water damage bill.
- The “It Passed the Hose Test” Delusion. The installer sprays a garden hose at the door for five quiet minutes, sees no drip, and signs off. This test is useless. It simulates a gentle shower on a calm day. It does not simulate a 50 mph nor’easter blasting rain sideways for eight hours, creating positive pressure on one side of the door and negative on the other. Real-world failure is about sustained, wind-driven pressure differentials.
How It Should Have Been Done From the Start (The Theory We Ignore)
Proper weatherproofing starts at procurement and specification, not with a tube of sealant after the fact.
- Specify the Right Assembly: You need a door that is both panic-device rated AND listed for exterior/rooftop use. This isn’t optional. It should have a factory-installed, integrated weather seal system designed to interface with the specific panic device. This is a system, not a collection of parts.
- Demand a Boot Seal or Grommet System: The critical detail is the rod penetration. A proper assembly uses a flexible, durable boot or grommet that seals tightly around the actuating rod(s). This boot is connected to the door’s internal drainage plane.
- Understand the Drainage Plane: Inside the door’s edge, there should be a channel or “moat.” The rod penetrates this moat via the sealed boot. Any water that gets past the first seal enters this moat. The door is designed (sloped, channeled) to direct this water to a drain hole that discharges on the exterior face of the door, above the threshold. Water is given an escape route outside before it ever reaches the interior.
- Installation Intelligence: The panic bar must be mounted with its drain holes at the bottom, perfectly aligned with the door’s internal drainage channels. This requires the installer to know which end is up and to care about more than just getting the door on its hinges. A tall order, I know.
The Messy, Snarky Reality: Fixing the Leak You Inherited
You’re likely not buying a new door. You’re fixing the leaky disaster someone else bought. Here’s the grumpy, unvarnished retrofit guide.
- Diagnose Like a Cynic: Get a hose and a helper with a flashlight. From the outside, simulate wind-driven rain. Don’t just spray the center; blast the edges, the threshold-to-door interface, and directly at the gap around the latch bolt on the door edge. Your helper inside will watch the panic bar housing and rod entry point. That’s your leak path. Believe what you see.
- Disassemble & Discover the Horror: Take the panic bar off. Look at the rod holes in the door. Is there rust? Failed, brittle old sealant? Corrosion? Clean it all out. You need bare, clean metal. This is the foundation of your fix.
- Use the Right Sealant, in the Right Order: This is a two-part defense.
- Primary Seal (Exterior Side): Use a butyl rubber-based sealant tape or a non-skinning, non-hardening mastic. Apply this around the rod hole on the exterior-side surface of the door metal. This remains pliable and forms a durable, watertight gasket. It’s your main barrier.
- Secondary Seal (Interior Side): After the rod is fed through, on the interior side, use a high-quality, paintable silicone or urethane sealant around the mounting plate and rod interface. This is a backup, not the primary defense.
- Check & Clear the Drainage Path: Examine the panic bar. Find its weep/drain holes. When you remount, ensure these are at the absolute bottom and are completely unobstructed. If the door lacks a clear internal drain to the exterior, you may need to—with extreme care—use a file to create a tiny escape channel in the door’s edge that leads water outside. This is delicate surgery. If you’re not confident, call a specialist. A bad channel is worse than no channel.
- The Threshold is King: None of this matters if the door doesn’t seal against the threshold. The threshold saddle must be perfectly sealed to the roofing membrane. The door must close with positive pressure against the threshold gasket. Check for warping. Adjust the door closer so it pulls the door firmly shut against the seal. A weak closer is a leak guarantee.
The Grumpy Procurement Verdict
Weatherproofing a panic device isn’t a mystery. It’s the application of basic building envelope principles to a stupidly overlooked detail. It’s not about keeping out mythical vertical rain; it’s about managing the water that will be driven into gaps by real-world weather.
You need:
1. A door and hardware assembly designed as a system for exterior use.
2. A properly sealed penetration for the actuating rods—boots, not caulk.
3. A clear, exterior-directed drainage path for incidental water.
4. An installer or maintenance team that understands both roofing and door hardware, not just one or the other.
This isn’t rocket surgery. It’s attention to detail. And in our world of value-engineered chaos, that detail is the first thing thrown over the parapet wall. Now go fix it. And next time, spec it right.
⚠️ AHJ WARNING: THE NON-NEGOTIABLE TRUTH
Listen closely. I might be grumpy, but I’m not reckless. The Authority Having Jurisdiction (AHJ)—your local building inspector, fire marshal, or insurance engineer—holds the ultimate card. Always.
Panic hardware is, first, last, and always, a life safety device. Its sole, critical, non-negotiable function is to allow immediate, uninhibited egress during an emergency, with zero prior knowledge of its operation.
ANY modification, sealant application, or retrofit you perform MUST NOT—UNDER ANY CIRCUMSTANCES—impede its function. You cannot glue rods in place. You cannot clog the mechanism with mastic. You cannot adjust the door so the panic bar requires more than 15-20 lbs of force to operate. If your “weatherproofing” fix makes the device sticky, slow, or inoperative, you have not fixed a leak. You have created a massive code violation and a potentially deadly life safety hazard that is orders of magnitude worse than a puddle on the floor.
When in doubt, and especially for major retrofits, submit your proposed fix to the AHJ for review before you start. This article is a guide to the problem and principles, not a substitute for approved construction documents or the authority of your local inspector. Don’t be the person who trades a water leak for a headline.