
Installing a Panic Bar Yourself: A Grumpy Truth Bomb
So you watched a YouTube video. You saw a guy in a pristine garage click a panic bar into place with the grace of a ballet dancer. Now you think you can do it. Wonderful. Let me, a procurement manager who’s been fighting with contractors, suppliers, and building inspectors for longer than I care to admit, set you straight. This isn’t assembling flat-pack furniture. This is installing a life safety device, and most of you have no business touching one without a professional and a sheaf of permits.
My job is to get things built legally, on time, and to spec. I see the invoices for fixing botched DIY jobs. I deal with the AHJ’s (that’s Authority Having Jurisdiction, but we’ll get to them) when things are wrong. What follows is not an inspirational guide. It’s a cautionary tale wrapped in a technical manual, delivered with the snark of a man whose coffee is always cold because someone else used the last pod.
The Cold, Hard Preamble: Or, Why You’re Already Wrong
Let’s start with the only fact that matters: a panic bar (crash bar, push bar, rim device if you’re feeling fancy) exists for one reason. To let a panicked crowd stampede through a door without having to turn a knob. Its entire design philosophy is ‘push here to not die.’ This isn’t hyperbole. It’s the lesson learned from a century of tragic fires.
Therefore, Step Zero, before you even google ‘panic bar for sale,’ is this: Is this door a designated fire exit or part of a legally required means of egress? If the answer is ‘yes,’ or ‘I’m not sure,’ your journey ends here. Your next click should be to find a licensed door and hardware contractor. You are playing in a sandbox of building codes, liability law, and municipal inspections. Your ‘good enough’ could literally be a death sentence and will definitely be a lawsuit.
Still reading? Fine. Maybe it’s for your garden shed, your man-cave saloon door, or some other non-life-threatening application. We’ll proceed. But I’m side-eyeing you from my desk, which is currently covered in three non-compliant product submittals.
The Procurement List: Stuff You Need But Don’t Have
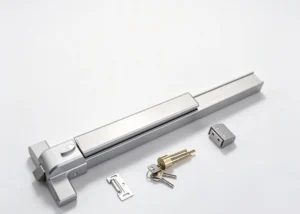
You’ll need the hardware itself. We’ll assume a surface-mounted bar because the concealed ones require the kind of precision usually reserved for watchmakers and brain surgeons.
Now for the tools. Forget your wimpy homeowner drill.
- A heavy-duty drill with a hammer function (you will hit steel).
- A hole saw kit (2-1/8" and 1" are common sizes, but read your instructions).
- Masonry bits (because of course the frame will be concrete).
- A long, accurate level. Your 12-inch IKEA special is worthless.
- A center punch. No, a nail is not a center punch.
- A sharp utility knife and a sharp pencil. Dried-up nubs need not apply.
- A set of chisels for mortising. You will ruin them.
- Safety glasses. Metal shavings in the cornea are a great way to spend your weekend.
And the most critical item: The Template. If your panic bar didn’t come with a precise paper or mylar template, go back to the supplier and demand one. “Winging it” with a tape measure is how you create a door that either won’t latch or requires the strength of a gorilla to open. The spacing between the actuator rods, the latch location, the mounting holes—it’s a symphony of precision. You are not a conductor.
The Canvas of Chaos: The Door and Frame
Your door is not a blank slate. It’s a prepared enemy.
Hollow Metal Doors (The Usual Suspect): There’s a stiffener inside where the latch must go. Your template aligns with this. Miss it, and your latch bites into thin air and sheet metal. Drilling the big hole for the latch case requires a sharp hole saw. A dull one will snag, spin the door like a top, and introduce you to the concept of ‘torque-induced injury.’
Solid Core Wood Doors: Heavy. Will devour cheap drill bits. You must support the back side when drilling or you’ll get a horrific blowout that looks like a woodpecker explosion.
The Mortise (A Word That Now Means ‘Regret’): You must chisel out a recess on the door edge for the latch case and the strike plate on the frame. Depth is everything. Too shallow, the door won’t close. Too deep, the hardware sits loose and wobbly. Your first attempt will look like it was done by a angry badger. This is normal.
The Frame Strike Plate: This isn’t a residential door strike. It’s a chunk of heavy-gauge metal, often with a roller. You must mortise this into the door frame. Is the frame steel? Enjoy the next three hours of drilling and chiseling. Aluminum? It’s softer but will gum up your tools like bureaucratic red tape. The alignment must be perfect. If the latch doesn’t hit the strike plate dead-center and roll smoothly in, your door will not secure. It will mock you.
The ‘Installation’: A Comedy of Errors in Five Acts
- Templating Theatre: Tape the template to the door at the code-specified height (usually 36-48 inches). Use your level. It’s not level. Adjust. Still not level. Swear. Use the center punch on every hole mark. This is the only thing preventing your drill bit from wandering off to Narnia.
- The Big Drilling: For the latch and crossbore holes. Slow and steady. Let the tool work. Smoke means you’re an impatient amateur. Clear shavings constantly. Don’t forget the smaller, perfectly aligned vertical holes for the actuator rods.
- Mortise Mayhem: Chisel out the door edge for the latch case. Test fit. It’s too shallow. Chisel more. Now it’s too deep. Fantastic. You’ll hide this sin with shims later. We all do.
- The Bench Test (The Moment of Truth): Assemble the bar on the door without final screws. Connect the tiny actuator rods to the latch mechanism (you will drop the set screws). Push the bar. Does the latch retract smoothly and spring back? Or does it bind and stick like a budget proposal in committee? Binding means your rod holes are misaligned. Disassemble and try to elongate them by a hair. This is where 70% of DIY attempts fail.
- Mounting and Frame Fight: If it works on the bench, mount it permanently. Use every screw. Now attack the frame. Mortise in the strike plate, drill the pilot holes with fanatical accuracy, and mount it. Close the door slowly. Does the latch engage with a satisfying thunk? Or does it go CLUNK-screeeeeee? Welcome to adjustment purgatory. Filing, bending, shimming. This is your life now.
The Grumpy Verdict
If, after all that, the bar depresses with reasonable force (codes often say under 15 lbs), springs back instantly, and the door latches securely every time, you have achieved a minor miracle. Pour a drink. Admire your crooked mortises and tool-marked door. You’ve saved some money and gained a profound appreciation for professionals.
But let’s be brutally honest: the time, frustration, and risk you just endured probably outweighed the cost of hiring someone with the right tools, knowledge, and most importantly, the liability insurance. Which brings me to my final, non-negotiable point.
***THE CAPS-LOCK REALITY CHECK FROM A PROFESSIONAL WHO DEALS WITH THE FALLOUT***
FOR THE LAST TIME, AND I CANNOT STRESS THIS ENOUGH:
YOU CANNOT LEGALLY INSTALL A PANIC BAR ON A CODE-REQUIRED FIRE EXIT WITHOUT THE INVOLVEMENT AND APPROVAL OF THE AHJ – THE AUTHORITY HAVING JURISDICTION.
This is your local Building Department, Fire Marshal, or Code Official. They are the arbiters of reality. They issue permits. They perform inspections. Their signature is what makes your building legally occupied and your insurance valid.
If you bypass this process, you have:
- Committed a violation of building and fire codes.
- Likely voided your certificate of occupancy.
- Almost certainly voided your property and liability insurance.
- Assumed personal, potentially criminal, liability. If that device fails in an emergency due to your install, you will be held responsible.
Use this article to understand the complexity. Use it to have an intelligent conversation with your contractor. Use it for your non-egress garden gate. But if this door is marked ‘EXIT,’ put down the drill and call a licensed professional. My job is procurement, not cleanup. And your botched DIY job is a procurement nightmare waiting to happen.
Now get off my metaphorical lawn. And for heaven’s sake, sweep up those metal shavings.