
The Grumpy Truth About Panic Bars: A Rant & Rough Guide
You have a commercial steel door. A hollow metal one, presumably. And now, due to some confluence of poor planning, a fire marshal’s withering stare, or a sudden, horrifying vision of liability, you need to attach an exit device. A panic bar. A crash bar. Call it what you want. You’re here, in the metaphorical procurement trench, and I am already exasperated. Because the statistical likelihood of this going smoothly is slightly lower than that of finding a cooperative supplier during a global chip shortage.
Let’s be brutally clear: this is not IKEA furniture. This is not a weekend project to impress your neighbors. Screw this up, and the consequences range from the embarrassing (a flimsy, wobbly mess that fails under the pressure of a frustrated employee) to the catastrophic (a device that fails during an actual panic, which is, ironically, its entire raison d’être) to the financially ruinous (voiding the fire rating of a $3,000 door assembly because you drilled in the wrong spot). The Authorities Having Jurisdiction—the AHJ, the only acronym you need to fear and respect—will not be amused. They will make you buy a new door, and they will enjoy watching you do it.
Gathering Your Arsenal (Stop Whining)
First, tools. Procure them. Do not attempt this with a butter knife and hope.
- A competent cordless drill. Not the one you found in a puddle.
- Metal-cutting hole saws. Typically 1” for the latch, 2-1/8” for the cylinder if needed. Wood bits will perish. They will scream and die. It’s a metaphor for your project.
- A sharp center punch and a hammer. This prevents your drill bit from skating across the steel like a drunk penguin on ice, leaving a scar that screams ‘amateur hour’.
- High-Speed Steel (HSS) drill bits. Pilot, then step up. 1/8”, then 1/4”, then final size. Patience is a theoretical concept we must occasionally entertain.
- Accurate measuring devices: A metal tape measure, a combination square, a level that wasn’t a cereal box prize.
- Safety glasses. Metal shavings in the eye offer a unique, starring role in your own Darwin Award submission.
- Grease pencil or fine marker. For marking your future regrets on the door.
- A file or deburring tool. The edges of your new holes will be razor-sharp. They will sever fingers and wire insulation with equal glee.
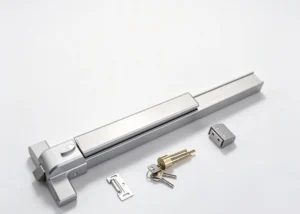
- The hardware kit. Contains the bar, brackets, screws, latch, strike plate. Try not to lose the critical small parts. I know it’s tempting.
Phase 1: The Documentation You Will Ignore (A Classic Mistake)
In the box, beneath the Styrofoam and the vaguely chemical smell, lies a flimsy piece of paper. The manufacturer’s template. This is not packing material. It is not a suggestion. It is the holy scripture, the map to the treasure, the only thing standing between you and a door that looks like it was attacked by a meth-addicted woodpecker. It dictates, with tyrannical precision, the location of every hole: bracket mounts, latch bore, cylinder. The distances from the door edge are commandments, not guidelines.
Now, assess the door itself. Is it ‘prepped’? Does it have an existing cylindrical lock bore? This could be a blessing or a curse. Most panic bars are centerline devices—their mechanism aligns with the center of the door’s thickness. Your existing hole may be off-center. Measure. Verify. Assume everything from the supplier is wrong until proven otherwise. It’s a healthy mindset.
Phase 2: Committing to the Metal (The Point of No Return)
Clean the door edge. Remove dirt, paint blobs, the ghost of installations past. Affix the template. Use the door edge and your square to align it perfectly. If the template is crooked, your finished product will look like it was installed during an earthquake. Triple-check. Then, with your center punch and hammer, make a firm, decisive dimple on the steel at every marked hole location—on the edge for the latch, on the face for the brackets. This gives your drill bit a fighting chance.
Phase 3: The Orchestrated Violence of Drilling
Begin with the cross bore on the door edge. This is typically the large hole for the latch mechanism. Secure your hole saw. Apply steady, firm pressure. Let the tool work. Do not lean on it as if you’re trying to start a 1972 lawnmower in a rainstorm. You will feel it punch through the outer steel skin, chatter through the honeycomb core, and finally breach the inner skin. Withdraw. Behold your creation: a perfect circle, ringed with vicious, filament-like burrs. Deburr it. Inside and out. Run your finger around it. If it draws blood, it will murder gaskets and wires. Use the file. This is non-negotiable.
Next, the face holes. Start with a small (1/8”) pilot bit for every punch mark. This establishes accuracy. Then, drill to the final specified size. The mounting screws are often #12 or 1/4-20 machine screws. The hole size matters. Too large, and the screw threads have nothing to bite; the first solid push on the bar will strip them. Too small, and you’ll snap the screw head off, leaving a embedded metal tumor you’ll spend hours drilling out, cursing the heavens.
The cylinder hole (if required) follows the same solemn ritual. 2-1/8” hole saw, centered on the cross bore. Expect sparks. It’s fine. It’s also a metaphor.
Phase 4: The Dry Fit – Where Hubris Meets Reality
Before final assembly, perform a dry fit. Insert the latch mechanism into the edge of the door. Does it sit flush? Do the mounting bracket holes align? This is your last, best chance to correct errors without it looking like a salvage job. Insert the latch body. Thread the connecting rods—those long, temperamental metal sticks—from the latch up through the door to where the panic bar will live. There’s often a vertical rod for a top latch. These rods are prima donnas. Do not kink them. They will refuse to work out of spite.
Phase 5: The Actual Assembly (A Three-Handed Job)
Latch in? Rods protruding? Good. Now, attach the end brackets to the panic bar itself. Then, the fun part: hoist the entire assembly onto the door, attempting to simultaneously align the bar, connect the fussy rods to the mechanism on the bar’s underside, and not drop the whole expensive contraption on your foot. This requires a minimum of three hands. You will invent new swear words. I encourage this creative outlet.
Once the rods are connected and the bar is vaguely positioned, start threading the mounting screws through the brackets and into the door. Do not fully tighten them yet. Snug them enough to hold. Alignment is still fluid.
Phase 6: The Operational Gut Check
Push the bar. Does the latch retract smoothly? Does it spring back with a satisfying thunk? If there’s a top rod, does that latch operate in unison? If it binds, you have a problem: a kinked rod, or the bar is misaligned. Loosen the brackets. Adjust minutely. Try again. This is the fiddly, patience-eroding core of the project. This is where you earn your metaphorical stripes.
When internal operation is smooth, test the outside—the lever or key cylinder. Does it function? Excellent. Now, gradually tighten all mounting screws, alternating and checking the operation after each turn to ensure you’re not pulling the mechanism into a bind.
Finally, the strike plate on the frame. This is critical. The latch must throw deeply into the strike. Use its template. If the latch only catches by a millimeter, a solid shove will defeat it. It needs to fully engage.
Phase 7: The Stress Test (Punishing Your Work)
Now, abuse it. Push the bar hard in the middle. Push it at the ends. It should activate with consistent, code-compliant force (usually under 15 lbs). The door should swing open freely. The latch must reset every single time. Do this twenty times. Then do it twenty more. This device exists for a single, terrible moment. Test it as if that moment is now.
The Unavoidable, Grim Reality Check
So it’s on. It works. It might even be almost straight. You may feel a surge of DIY triumph. Cherish it briefly.
Then immediately discard that feeling, because it is dangerously irrelevant.
AHJ WARNING: Let me be unequivocal. Nothing described above, and no installation you perform, carries any official weight until it is inspected and approved by the Authorities Having Jurisdiction. The local fire marshal. The building inspector. The state fire marshal’s office. The entity that owns the code book in your municipality.
I do not care if you followed the template to a micron. Did you use the exact manufacturer-listed screws, or generic ones from your junk drawer? Is the panic bar itself UL-listed for use on a fire door? Is the door leaf rated to accept this specific hardware? Is the installation compliant with NFPA 80 (Standard for Fire Doors and Other Opening Protectives) and the relevant sections of the International Building Code? Did you, in your drilling fervor, unknowingly puncture a fire label? Is the latch throw depth sufficient per code?
You don’t know. I don’t know your specific door-assembly listing. An improper installation can, and will, void the fire rating of the entire door assembly. In a fire, that compromised door could fail prematurely, becoming a funnel for smoke and flame. Your insurance provider would deny any related claim with the speed of a lawyer spotting a loophole. The AHJ will red-tag it, potentially shut down the occupancy, and mandate a complete replacement with a certified, professionally installed unit.
This is not procurement advice. This is not grumpy commentary. This is the legal and safety bottom line. Your weekend project means nothing until the person with the badge, the clipboard, and the power to condemn your building says it does. So, by all means, learn. Understand the mechanics. Then, in almost every commercial scenario, hire a certified door and hardware consultant and a licensed installer. Document everything. Get the inspection. Save the certification paperwork.
Now, please, clean up the metal shavings from my hypothetical floor. And for heaven’s sake, get that installation inspected.