
The Grumpy Installer’s Guide to Glass Door Panic Bars: A Cautionary Manifesto
Listen. I’ve been procuring and managing hardware installations since before your supplier’s “just-in-time” delivery meant “maybe next Thursday.” I’ve seen panic bars installed with more optimism than sense, witnessed glass doors treated like they’re made of wood, and watched grown project managers weep over manufacturer specifications. You want to install a panic bar on a glass door? Wonderful. Another procurement “value engineering” exercise doomed from conception.
This isn’t your cheerful American DIY tutorial with smiling contractors and perfect results. This is the European reality: specifications matter, certifications are everything, and your beautiful glass door is one incorrect installation away from becoming an expensive liability. Let’s begin with the uncomfortable truths you’ll likely ignore.
The Preliminary Reality Check You’ll Probably Skip
The Glass Itself: If your documentation doesn’t explicitly state “tempered safety glass” with the appropriate EN standards (EN 12600, EN 14449), stop immediately. That beautiful clear panel? It’s a lawsuit waiting to happen. Check for the manufacturer’s mark—usually etched in the corner. If it doesn’t say “tempered” or show the CE marking with proper glass standards, you’re not installing hardware; you’re creating workplace hazard documentation.
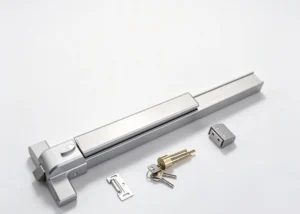
The Hardware Procurement Nightmare: You cannot purchase generic exit devices and expect compliance. For glass doors, you need specifically engineered systems: surface-mounted rim devices with specialized glass door adapters or dedicated glass door panic bars. These typically involve clamp-on channels (ASTM/EN rated, naturally) that distribute load across the glass surface. They’re not aesthetically pleasing—they’re functional. Your architect’s beautiful minimalist vision just collided with fire code reality.
The Installation Procedure: Structured Chaos
Step 1: Documentation Forensics
Before touching tools, verify:
• Manufacturer’s installation guide (specific to glass door applications)
• Technical specifications for tempered glass compatibility
• Load distribution calculations for your specific glass thickness
• Certification documentation (CE marking, UKCA, relevant EN standards)
Step 2: Template Interpretation Hell
The included template will have more measurement options than IKEA instructions translated through three languages. It accounts for various glass thicknesses, hardware configurations, and regional compliance requirements. Misinterpretation means incorrect hole placement. Incorrect holes mean stress concentrations. Stress concentrations mean spontaneous glass failure at 3 AM when the temperature drops.
Step 3: The Drilling Process – Precision Under Pressure
Diamond-tipped hole saws. Coolant systems. Drill press with precise feed control. This isn’t woodworking; this’s material science with consequences. Each hole must be:
• Perfectly perpendicular to the glass surface
• Deburred and polished to eliminate microscopic cracks
• Positioned according to load distribution specifications
One angled hole, one rushed drilling operation, and you’ve created a failure point that might not manifest for months.
The Assembly: Where Theory Meets Practical Despair
Channel Installation: The clamping channels must be installed with:
• Correct sequence of spacers and gaskets (they’re not interchangeable)
• Specified torque values for each fastener (no, “tight” isn’t a torque specification)
• Proper alignment to within tolerances you’ll need measuring equipment to verify
Hardware Mounting: The panic bar itself weighs considerably more than anticipated. Mounting requires simultaneous alignment of multiple connection points while ensuring the clamping force remains evenly distributed. This typically needs three people: one to hold, one to align, one to start fasteners. You have two junior procurement assistants. Good luck.
Latch Mechanism Alignment: Whether vertical rod or mortice latch, alignment tolerances are measured in millimeters. The strike plate (floor or frame mounted) must align perfectly with the latch. This involves:
• Temporary assembly
• Testing
• Disassembly
• Adjustment
• Repeat until compliance is achieved or patience expires
The Final Truth: Why This Usually Fails
You’ve followed procedures, used correct tools, installed per manufacturer guidelines. Functionally, it works. The panic bar depresses, the latch retracts, the door opens.
And none of that matters if the Authority Having Jurisdiction (AHJ) doesn’t approve it.
The AHJ—your local building control officer, fire safety inspector, or certification body—holds ultimate authority. They evaluate against:
• Building Regulations (England & Wales)
• Building Standards (Scotland)
• Technical Guidance Documents (Ireland)
• EN standards for hardware and glass
• Specific occupancy requirements for your building type
Critical Reality: Most panic bars require certified installation by manufacturer-trained technicians to maintain their fire rating and safety certifications. Your “successful” DIY installation likely voids:
• The hardware warranty
• The fire resistance rating
• The product liability coverage
• Your insurance policy’s relevant clauses
When the AHJ inspector arrives (and they will for commercial properties), they’ll request:
• Installation certification from qualified personnel
• Documentation of glass compatibility
• Load calculation verification
• Declaration of Performance documentation
Your carefully compiled folder of purchase receipts and downloaded manuals will receive the same look European customs officials give suspicious luggage.
The Procurement Professional’s Advice
Use this knowledge not to install, but to:
1. Specify correctly in tender documents
2. Evaluate bids with technical understanding
3. Manage contractors who actually hold certifications
4. Maintain documentation for the building’s life cycle
Your role isn’t to become an installation expert. Your role is to procure compliant solutions, manage qualified contractors, and maintain audit trails that satisfy safety regulations. The cost difference between DIY and professional installation isn’t expense—it’s transferred liability, maintained certifications, and regulatory compliance.
Now take this understanding back to your procurement committee. Specify properly. Hire certified professionals. Maintain the documentation. And for heaven’s sake, stop treating life safety hardware like it’s office furniture assembly.
AHJ WARNING: This article describes technical processes for informational purposes only. All panic bar installations on glass doors must comply with local building codes, fire safety regulations, and manufacturer requirements. Installation by uncertified personnel may void warranties, invalidate safety certifications, and create legal liability. Always consult with qualified professionals and obtain necessary approvals from your Authority Having Jurisdiction before proceeding with any life safety hardware installation.