Vandal-Proofing School Exit Doors: The Grumpy Procurement Manager’s Guide
Let’s be perfectly clear: you’ve called me a “grumpy industry expert.” You’re not wrong. I’m grumpy because for three decades, I’ve watched schools and institutions install the same standard panic hardware on exit doors and then act astonished—astonished—when a teenager with the ingenuity of a bored raccoon and a stolen spork manages to defeat, break, or prop it open. The standard panic bar is a masterpiece of simple engineering designed for one thing: to let people out safely during a panic. It was never designed to withstand the nightly siege conducted by adolescents armed with TikTok challenges and a profound contempt for property.
So, you want to talk about vandal-proofing? Fine. But forget the glossy brochures and marketing fluff. This is trench warfare. This is about layering defenses because the standard panic bar, on its own, is about as resilient as a wet paper bag against a dedicated vandal.
The Problem Isn’t the Door. It’s Everything Around the Door.
First, diagnose the enemy’s tactics. What are they actually doing?
- The Prop and Hold: It’s not sophisticated. A rock, a chair, a textbook wedged in the gap at the bottom of the door. The panic bar works perfectly. The door opens. And stays open. Your HVAC budget is now funding the atmosphere for the entire neighborhood, and your security plan is a joke.
- The Brute Force Concussion: Kicking the panic bar. Repeatedly. Not to open it, but to see if they can bend the rod, break the end cap, or simply enjoy the thunderous CLANG-CLANG-CLANGGG that echoes through the halls. It’s performance art. You’re the unwilling patron.
- Component Theft & Tampering: The tiny set-screws on the end cap? Gone. The “Remove Before Flight” style pin on older models? Yanked. The door coordinator? Pried at with a flat-edged ruler from the art room. They’re not always trying to break in; sometimes they’re just disassembling your hardware for fun.
- The Perimeter Attack: The panic bar is fine! Hooray! But the exposed hinges are a target. The door frame strike is being hammered. The vision light next to the door is now a projectile. The wall itself is getting carved up.
The “Beyond” Part: A Layered Defense Toolkit
Alright. You’ve got your code-required panic device. It’s installed. The AHJ (Authority Having Jurisdiction—remember that acronym) signed off. Now, let’s build a fortress around it without violating life safety codes or getting sued. This isn’t a checklist; it’s a mindset.
Layer 1: The Door Itself – Stop Being Cheap.
Stop specifying hollow metal doors that dent if you look at them funny. For high-abuse exits, you need a solid core door, clad in 14-gauge stainless steel. Yes, it costs more. You know what costs more? Replacing a hollow metal door six times in four years. The stiles and rails need to be robust. The edges should be reinforced. Think of it as armor. Because it is.
Layer 2: The Frame – The Forgotten Victim.
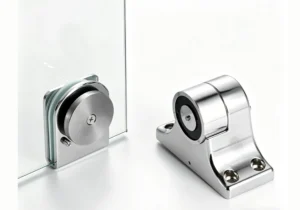
A panic bar on a flimsy frame is like putting a bank vault door on a plywood wall. Specify heavy-gauge, reinforced frames. Use continuous hinges—three minimum. Yes, they cost more than standard butt hinges. They also distribute weight and abuse across the entire height of the door, making it harder to sag or kick in, and they have fewer pickable pins. While you’re at it, protect the hinge pins with tamper-resistant fasteners or concealed pins.
Layer 3: The Hardware – The Devil’s in the Details.
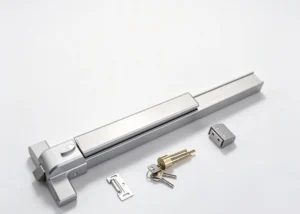
- Panic Bar Selection: Move beyond standard extruded aluminum. Opt for heavy-duty, cast aluminum or stainless steel models. Look for models with minimal exposed fasteners. End caps should be integral or secured with spanner-head or other specialty screws that require a tool Johnny Won’t Have in his backpack.
- Protective Shields: This is critical. You can get vandal-resistant covers for the entire panic bar. These are typically a U-shaped channel of thick stainless steel that bolts over the existing device. The push-bar still functions, but it’s now nearly impossible to kick, pry, or bend.
- Latch Protection: The strike plate is a weak point. Use a heavy-duty, reinforced strike box that anchors deep into the frame studs, not just the jamb. Consider a strike plate guard—a small piece of angled metal that makes it harder to jimmy the latch.
Layer 4: The Perimeter – Deny the Battlefield.
- Door Bottom/Threshold: This is prime propping real estate. Install an automatic door bottom. When the door closes, a seal drops down, eliminating that gap. No gap, no rock, no prop.
- Vision Lights: That glass panel is a target. Specify polycarbonate glazing, not glass. Not just “safety glass.” Polycarbonate. It’s what riot shields are made of. It will scratch, but it won’t shatter. Frame it in with a deep, secure bead so it can’t be popped out.
- Surrounding Walls: The area around the door gets scuffed, carved, and tagged. Use impact-resistant wall protection—high-density polyethylene sheets, ceramic tile, or rugged wainscoting. This makes the area harder to deface and easier to clean, which psychologically discourages further abuse.
Layer 5: The Electronic Nuisance (If You Must).
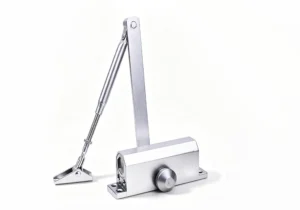
I’m old-school. I like mechanical things. But if you’re wiring things up, consider door position switches and alarms on delayed egress systems (where code-permitted and with AHJ approval). The delayed egress panic bar will allow exit after a 15-second delay but will trigger a loud alarm the moment it’s pushed. This isn’t to trap people; it’s to draw immediate attention to an unauthorized exit. A kid trying to sneak out doesn’t want a 120-decibel alarm announcing their departure. Pair it with a camera. The combination is a powerful deterrent.
The Grumpy Summary: It’s a System.
You don’t vandal-proof a door. You vandal-proof an assembly. The door, the frame, the hinges, the panic device, the strike, the threshold, the wall. Each one is a link in a chain. A vandal looks for the weakest link. Your job is to make every link as brutally strong as the one you’re legally required to install.
Stop thinking about “meeting code” for security. Code is the minimum for life safety. It is not a security guide. It is not a vandalism guide. Your job is to meet the code and then fortify the living daylights out of everything the code doesn’t explicitly forbid.
AHJ WARNING: Listen up. ANY modification, reinforcement, or accessory added to a fire door assembly—and an exit door is almost always a fire door—CAN AND WILL affect its listed fire rating. That protective shield over the panic bar? If it wasn’t tested and approved as part of the door’s listing with that specific hardware, you may have VOIDED the fire rating. That heavy-duty hinge? If it’s not listed for use on a fire door, you’re likely in violation. The Authority Having Jurisdiction—the Fire Marshal, the building official—will rightfully reject any field-modified work that compromises the life safety function of the door. Every single thing you do “beyond the standard panic bar” must be done with compatible, listed components and should be approved by the AHJ before installation. Document everything. Get approvals in writing. The vandals are a problem. Legal liability is a catastrophe.