Listen up. You spent millions on that cleanroom. You’ve got your HEPA filters whirring away, your gowning procedures that take half an hour, and protocols so strict they’d give a monk anxiety. And then you installed a cheap, shoddy panic device on the door. Congratulations, you just poked a hole in your own spacesuit.
This isn’t about fire codes. Well, it is, but that’s the bare minimum. This is about contamination control. Particle generation. The invisible garbage that ruins batches, fails audits, and costs more in recalls than your entire facility’s annual coffee budget. Your standard, off-the-shelf panic bar – the kind you’d find on the back door of a restaurant – is a particle-shedding, friction-generating, unsealed nightmare waiting to happen in a controlled environment.
Let’s talk about why this matters, because apparently, some of you think a door is just a door.
The Problem: Your Exit Device is a Contamination Fountain
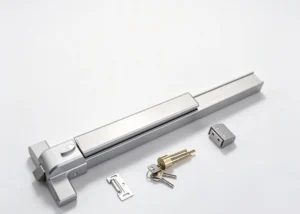
In pharmaceutical, biotech, and advanced microelectronics cleanrooms, we measure contamination in microns. We worry about skin flakes. A standard panic bar, or “rim device” in the jargon, is a mechanical beast. It’s got:
- Moving parts: Latches, rods, springs, pivots. Every time someone pushes that bar, metal grinds on metal. Ever so slightly. It sheds microscopic metal particles. It generates sub-micron friction debris. This is called “tribological shedding,” and your panic bar is a tribology festival.
- Finish: That brushed stainless steel? It looks nice in a hospital corridor. In a cleanroom, it’s a porous, scratch-happy surface that traps cleaning agents, sheds its own coating over time, and is a nightmare to truly decontaminate. Those tiny grooves are bioburden hotels.
- Sealing (or lack thereof): Where does the latch bolt go? Into a hole in the strike plate. That’s a direct, unsealed conduit between your dirty corridor (or “gray space”) and your pristine core. Airflow, particles, microbes – they all use that little highway. Your pressure differentials? They mean nothing if air is sneaking through the door hardware itself.
- Activation: The classic push-bar requires significant force and travel. This creates a piston effect. Slamming the bar inwards can push air – and whatever’s in it – from the lower-pressure side into the higher-pressure side. You’re literally pumping contamination into your clean space with every use.
It’s Not Just About the “Yuck”: It’s About the Rules
You think I’m being fastidious? Try explaining to an FDA investigator why you have a particle-generating device on your ISO 5 (Class 100) fill line door. ISO 14644-1 lays out particle counts for a reason. Your environmental monitoring program is supposed to catch excursions. A bad panic bar will give you consistent, low-grade background contamination that’s a devil to source. It’ll show up in your non-viable particle counts, mess with your trend charts, and have your quality people tearing their hair out.
And cleanroom garments? The whole point is to encapsulate the operator. But then you ask them to shove their suited forearm into a dirty mechanical device that’s outside the validated cleaning regimen. You’re transferring contamination directly onto the sleeve. It’s madness.
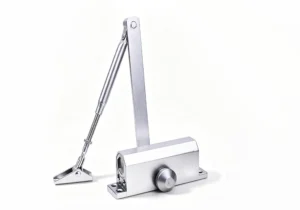
What a “Cleanroom-Grade” Panic Bar Actually Looks Like (It’s Not Rocket Science, Just Good Sense)
This isn’t about reinventing the wheel. It’s about specifying the right wheel for the damn racecar. Here’s what you should be demanding from your door hardware supplier, and if they blink, show them the door (with a proper bar on it, of course).
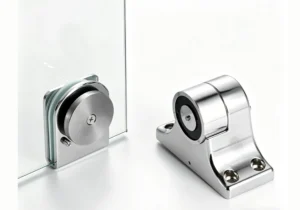
- Sealed, Smooth, and Non-Shedding Construction: The entire mechanism needs to be enclosed. We’re talking welded seams or continuously sealed housings. No visible fasteners. No gaps. The internal mechanics should be designed to minimize friction and, where friction exists, use polymer or coated components that shed less than metal. Think “sealed for life” lubrication that doesn’t weep out.
- Electropolished Finish: Forget brushed stainless. You want an electropolished (EP) finish. This isn’t just aesthetic; it’s a micro-smoothing process that removes surface imperfections, reduces surface area, and creates a passivated layer that is more resistant to corrosion and easier to clean. It should be smooth like a mirror, not lined like a cutting board.
- Gasketed and Sealed Latching: The strike area is critical. The latch bolt must seat into a gasketed or silicone-sealed strike. This creates a positive seal when the door is closed, blocking that air/particle conduit. Some high-end models for critical barriers even have perimeter seals integrated into the frame that engage with a flat, clean bar surface.
- Low-Force, Short-Throw Activation: The bar should require minimal force and travel to activate. The goal is to reduce the piston effect and make it easier for a gowned operator to use without contorting themselves. Some designs use a touch-pad or paddle that depresses only a few millimeters, not inches.
- Coving and Integration: The device should be designed to integrate cleanly with the door and wall. No ledges, no dirt traps. Ideally, the profile is coved or allows for a silicone sealant fillet to be applied, making it part of the cleanable surface, not an obstacle to it.
- Material Matters: 316L stainless steel is the baseline. For higher corrosive resistance (if you’re using aggressive sporicidal agents), you might need to look at higher grades or specialized coatings. No zinc-plated anything. Ever.
The Installation Nightmare (Where It All Goes Wrong)
Here’s the part that makes me genuinely angry. You can spec the perfect, gold-plated, NASA-grade panic bar. And then you hand it to a contractor who’s used to installing hardware in school gyms. They’ll:
- Drill the mounting holes on-site, creating metal shavings that fall into the cleanroom wall cavity or floor.
- Use non-cleanroom compatible sealants (or worse, none at all) around the mounting brackets and penetrations.
- Leave adjustment screws exposed.
- Not clean the device of manufacturing oils before putting it into service.
The specification MUST include the installation protocol. It should be bagged in clean packaging, installed during a controlled construction phase (if not pre-mounted on a door in a clean factory), and all penetrations must be sealed with an approved, non-porous, cleanroom-compatible sealant (like a silicone). The final installation must be part of the room’s cleaning and disinfection validation. Yes, you need to swab the panic bar.
The Cost Argument (The Stupidest Argument)
“But these specialty devices cost three to five times more than a standard panic bar!”
You know what’s more expensive? A batch failure. An investigation. A regulatory observation. A shutdown for remediation. The cost differential is in the hundreds or thousands of dollars. The risk you’re mitigating is in the millions. This is the cheapest insurance policy you’ll ever buy for your cleanroom integrity. If your procurement department balks at this, they have no business being in a GMP environment. Send them to work in a warehouse.
The Fire Marshal vs. The Quality Manager (A Cage Match We Need to Avoid)
Here’s the inevitable conflict. You install a beautiful, sealed, gasketed panic bar. The local Fire Marshal (the Authority Having Jurisdiction, or AHJ) walks in for an inspection. He pushes the bar. It requires a bit more force than he’s used to because of the seals. Or the throw is shorter. He declares it “not to code” because it doesn’t meet the prescriptive force and travel requirements he has in his little booklet for a standard bar.
This is where you, the facility expert, fail. You should have involved the AHJ during the design phase. You don’t just slap it in and hope. You educate them. You explain the unique contamination control requirements. You provide the manufacturer’s certification that the device meets the performance-based requirements of the building and life safety codes (like NFPA 101, which allows for alternatives that provide equivalent safety). You invite them to see the cleanroom, to understand why a 1/8-inch particle gap is unacceptable. You get their buy-in before they show up for the final inspection with a red tag. Managing the AHJ is a critical part of the job. Failure to do so is professional malpractice.
The Bottom Line
Your cleanroom is a system. Every component is a link in the chain of contamination control. The door hardware is not an architectural afterthought; it is a critical control point. Specifying the wrong panic bar is like using a garden hose to fill a syringe – it defeats the entire purpose of the precision system you’ve built.
Stop treating your panic hardware like it’s just a fire code checkbox. It’s a particle generator. It’s a contamination vector. It’s a weak link. Do it right, or don’t bother doing it at all.
***AHJ WARNING***
Look, I don’t care how grumpy I sound. This is important. Every jurisdiction, every Fire Marshal (the AHJ), interprets the codes differently. The model codes (IBC, NFPA) are the baseline, but your local inspector has the final, absolute, unchallengeable-in-the-moment say. You MUST engage them early in the design process. Do not assume your beautiful, sealed, cleanroom panic bar will get their automatic approval. Schedule a meeting. Bring the manufacturer’s specs and code compliance reports. Explain the critical need. Get their written approval or specific requirements before you purchase or install a single device. Their sign-off is not a formality; it is the single most important document for that piece of hardware. Failure to do this will leave you with a very expensive, non-compliant paperweight on your critical door, and they will shut your multi-million dollar facility down. Don’t be an idiot. Talk to the AHJ first.